Author Archives: Peter

TF1230 FAQ

The TerribleFire TF1230 is an outstanding accelerator card with a 68030, 50MHz processor and 128MB FastRam for the Amiga 1200.

However, the card is not really “plug & play” and a few things need to be taken into account.

  • TF1230 IDE Interface
    In order for the Amiga to boot from the IDE interface on the TF1230, a special IDE driver – ehide.device – must be loaded. This can either be done in the Kickstart Rom (recommended) or it is booted from floppy disk/internal hard disk and the ehide.device driver is loaded first. The TF1230 IDE interface is considerably faster than the internal IDE port.
    When booting from the TF1230 IDE interface, the CF-IDE adapter must be removed on most Amiga1200s, otherwise the Amiga1200 will not boot at all. If the boot process is interrupted, it may be necessary to install an IDE buffer on the internal IDE port (we do not yet have this in the program).
  • ehide.device
    The driver for the TF1230 interface can be downloaded here =>. There are 2 versions that have a different size. The one from our website is the one that can be copied into a Hyperion 3.2.2 47.111 Kickstart without deleting other modules.
  • Create boot floppy
    To boot from the TF1230 IDE interface without using modified kickstart roms, a boot floppy must be created with the ehide.device driver, which is loaded via loadmodule in the startup.sequence:

    s:startup-sequence
    loadmodule >NIL: devs:ehide.device

    Loadmodule can be loaded here => https://aminet.net/package/util/boot/LoadModule from Aminet. After booting from the floppy disk and a soft reset (Ctrl-Amiga-Amiga) the TF1230 IDE interface is used for booting.
  • Amiga1200 Timing Fixes
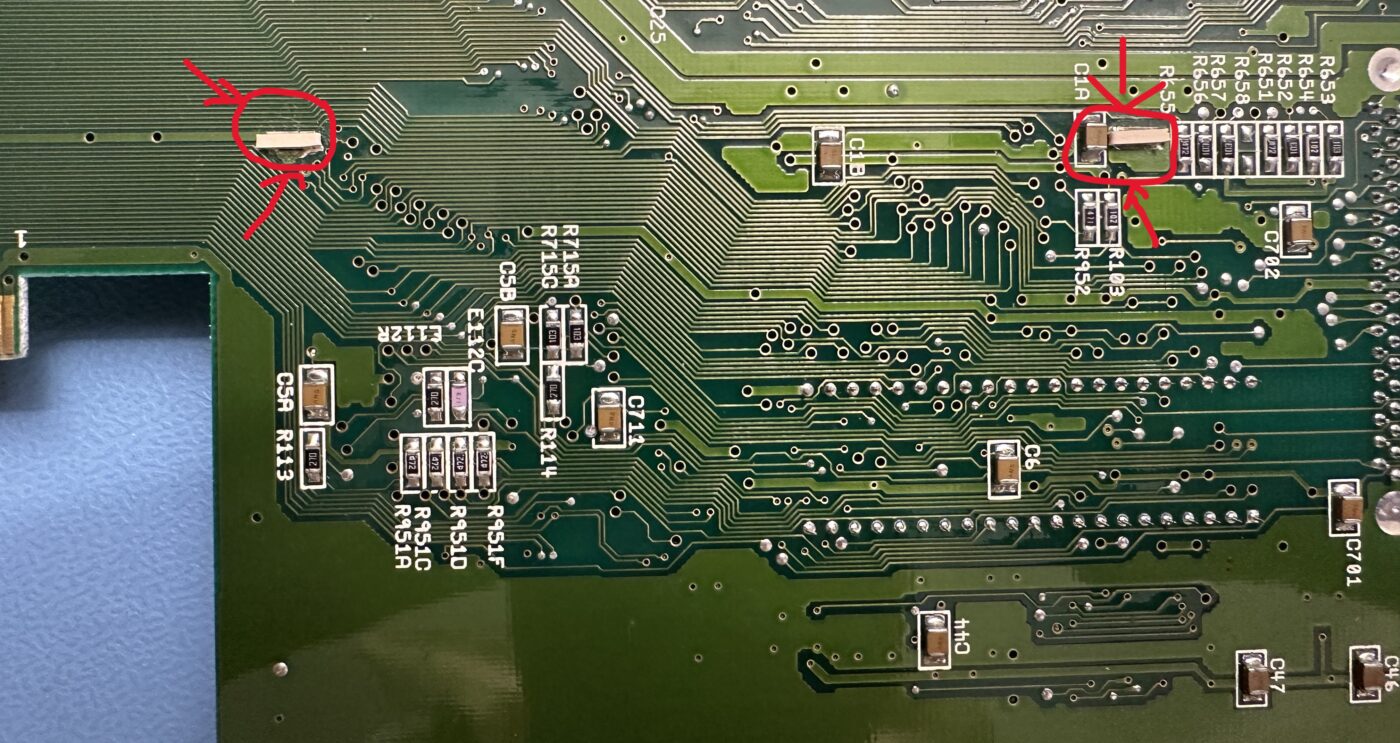
    The Amiga1200 has a few problems with the timings that lead to lockups and freezing of the Amiga1200 – even without the TF1230 card. Therefore the capacitors E123C and E125C on the bottom side of the mainboard should be removed on 1D4 Rev01 and Rev.2B mainboards. On a Rev 2B mainboard, it may also be necessary to replace R118 with a 220 Ohm resistor
  • Unevenness of the edge connector
    A few A1200 mainboards have an unevenness between the short and the long part of the edge connector, which can lead to the connection of the TF1230 card being destroyed. How can this be detected? If the TF1230 card cannot be installed with light pressure, the edge connector is probably uneven.
  • Firmware update
    We have installed the latest firmware on our maps. However, it is possible that Stephen Leary will release a new version. In any case, please only use the version for the Xilink 95288XL CPLD. The XC95144 versions can destroy the card!
  • Kickstart <3.0
  • Hard disks on the TF1230 IDE interface
    In brief: Real hard disks do not work on the TF1230 IDE interface due to the high power consumption. Please do not use and do not try.

xxx

PiStorm FAQ

Over the last few weeks, we have compiled the most frequently asked questions from our customers about the PiStorm in an FAQ. The list is certainly not yet complete and will therefore continue to be added to.

  • Can the Raspberry Pi 5 be used for the PiStorm?
    • No. The Raspi 5 has been changed in many ways and unfortunately cannot (yet) be used.
  • Can the Raspberry Pi 4 be used for the PiStorm Classic or PiStorm 2k?
    • Yes and no. It usually works, but is not officially supported. In other words: If there are difficulties, you are responsible and there will hardly be anyone who can help.
  • Do you sell CaffeineOS?
    • No. CaffeineOS is free software, based on AmigaOS 3.9 and was created by Pedro Cotter. We offer our customers suitable SD cards with the current version of CaffeineOS for the price of the SD card. CaffeineOS can be downloaded here => https://bit.ly/m/CaffeineOS and installed on a suitable SD card with the WinImager under Windows. The Win32 Disk Imager can be downloaded here => https://win32diskimager.org/.
  • Do you sell AmigaOS?
    • Yes, we are one of the larger European Hyperion Entertainment partners and sell several hundred licenses every year. AmigaOS 3.2 is commercial software and is constantly being developed further from the license fees. AmigaOS 3.3 has been in development for some time now. Please note that AmigaOS 1.2 – AmigaOS 3.1 is to be licensed from Cloanto. From AmigaOS 3.2 Hyperion Entertainment has the rights to the Kickstart and the Workbench. We offer AmigaOS in different bundles for all Classic Amigas from Amiga500 – Amiga4000 and with images for many common accelerator cards.
  • AmigaOS or CaffeineOS?
    • It depends 🙂 In principle, we recommend the use of CaffeineOS. Beautiful desktop, easy to use and very user friendly. But unfortunately nobody can say how long Caffeine will still exist. It has already disappeared overnight several times and only Pedro Cotter maintains “his” distribution.
    • AmigaOS is commercial software and with the Emu68 imager tool it has become very easy to do a very good basic installation with all the tools you need. However, it is also a very classic 80s/90s workbench desktop and many tools have to be installed manually.
  • Can you recommend the LazaruStorm adapter?
    • The LazaruStorm adapter is the only currently existing possibility not to remove the 68k CPU in the Amiga and still use the PiStorm. However, the adapter is a messy hack and it does not always work, as both CPUs (PiStorm and 68k) “fight” for the bus signals. We supply our LazaruStorm adapters with the recommended jumpering (“VPAJP 2-3” and “BRJP” not bridged). We have had the best experiences with the Amiga 500 Rev 6a mainboards. The adapter usually works here. We can *not* recommend the adapter for Amiga 500 Rev5 or earlier. With Rev8a mainboards the adapter usually works. If the PiStorm does not start, simply press “CTRL-Amiga-Amiga” until it starts. Unfortunately, this is the only possible solution if the PiStorm – regardless of the mainboard version – does not start.
  • Does the PiStorm require cooling?
    • Yes and no. PiStorms with Raspberry Pi 3 and 4 do not require cooling. Only the CM4 module on the PiStorm32 CM4 + I/O module requires its own passive or active cooling. We offer the cooling modules from Waveshare. We generally recommend the active cooler module. The fan runs at 8000rpm +/-10% and is not controllable via the CM4 and I/O board. It is so quiet in operation that you can hardly hear it.
  • Does wired Ethernet work?
    • Yes and no. Under Emu68 (standard and recommended) there is no driver for wired Ethernet. Only under Musashi can wired Ethernet be configured. Linux knowledge is required and it is not easy.
  • Do the mouse and keyboard work via USB?
    • Yes and no. Under Emu68 (standard and recommended) there is still no driver for mouse + keyboard via USB. Only under Musashi USB mice and keyboards can be configured. It is not that easy.
  • What are Emu68 and Musashi?
    • Emu68 is a so-called “bare metal” 68k emulator developed by Michal Schulz. The Github can be found here => https://github.com/michalsc/Emu68. Emu68 is the recommended emulator for the PiStorm – even if some drivers are still missing. Michal’s patron page can be found here => https://www.patreon.com/c/michal_schulz/posts. We support the development regularly.
    • Musashi is a 68k emulator based on Linux, which unfortunately has not been developed further for several years. Without Musashi there would probably be no PiStorm and many of the PiStorm docs still contain references to Musashi. Since Musashi is based on Linux, separate drivers are not required for all possible devices (USB, Ethernet etc pp), so that Musashi supports more hardware on and in the Amiga. However, the emulation is much slower and the configuration is much more complicated. We strongly advise against using it
  • Where can I find documentation and help for PiStorm?
  • How do I control the settings of the PiStorm, especially the emulated processor speed and the graphics resolution for the Amiga?
    • For both CaffeineOS and AmigaOS there are corresponding tools to easily change the command line options via a GUI.
  • Does WLAN/WiFi work?
  • How do I create the required SD card with Emu68 myself?
    • For AmigaOS we recommend the Emu68-Imager Tool. This only runs under Windows 10/Windows 11. MacOS is – also in the future – not supported. It can be found here => https://mja65.github.io/Emu68-Imager/. SD cards of any size from any manufacturer can be used.
    • The image for CaffeineOS can be downloaded here => https://bit.ly/m/CaffeineOS and copied to a 64GB card using the Win32 Imager. Attention: The image is so large that in principle only the 64GB SanDisk Extreme will fit. These are available in our store (with and without CaffeineOS at the same price).
  • Does the entire graphics output run via HDMI?
    • No! “Only” the software that supports Picasso96/RTG is currently output via HDMI. Everything else still runs via RGB and still requires 2 connections to the TV/monitor! The team around Claude Schwarz is currently working on a “Framethrower” for the PiStorm, which also redirects the RGB outputs to the HDMI port of the Raspberry. First demos exist but there is no ETA for the hardware extension (yet). Until then we recommend the parallel use of our RGB2HDMI adapters in the Amiga 500 and Amiga 2000, but it also requires 2 HDMI ports with the adapters *or* all outputs must be output to RGB. This can be configured classically on the Workbench. For the Amiga1200 there is a solution from Indivision that works well (Scan Doubler).
  • Does the sound run via HDMI?
    • No! As with the RGB2HDMI adapters, the sound output from the Paula chip is not “redirected” to the Denise chip and there is no emulation here. As before, small external speakers must therefore be connected to the RCA outputs.

If you have any further questions, please send an e-mail to info@retrobuddys.com.

CaffeineOS SD card

How do I create my own SD card for CaffeineOS?

First of all, you need the latest image of CaffeineOS. Simply request access to his Google Drive via the page of “CaptLeChuck” / Pedro Cotter => https://bit.ly/m/CaffeineOS. The images can be downloaded there as a torrent and as a ZIP file.

Then use the WinImager under Windows to upload to the SD card => https://win32diskimager.org/

WiFi is now super stable under CaffeineOS and even SMB share access works. The configuration is explained in this video: https://www.youtube.com/watch?v=YKYbILbx1p8 (English)

The recommended SD cards are the SanDiskUltra 32GB for images up to 9275 and the SanDiskExtreme 64GB for 64GB images. Both can be ordered from our store with the latest CaffeineOS. Other SD cards – whether 32GB or 64GB – may be too *small* for the image. This is because every SD card manufacturer “interprets” 32GB or 64GB differently.

Of course we do not “sell” CaffeineOS. CaffeineOS is free software, so the SD cards in the store with and without CaffeineOS have the same price. Only if the SD card is ordered together with a PiStorm is it slightly cheaper.

Shipping flat rate

Increase in the flat-rate shipping fee

Dear customers,

Unfortunately, due to increased costs at DHL, we have to increase our domestic shipping costs slightly. From the current €4.99 to €5.50. As a bulk buyer, we now pay €6.10 per parcel (up to 2 kg). If things get a little heavier, we are prepared to pay €6.50. Alarming but unfortunately true – and this with an annual shipping volume of around 3000 parcels.

Everything remains the same for our European customers. Even if the €14.99 does not cover the costs, we will continue to pay a similar amount as for domestic German parcels.

4-way kickstart switcher

Positive growth.

Nature, in the common sense, refers to essences unchanged by man; space, the air, the river, the leaf. Art is applied to the mixture of his will with the same things, as in a house, a canal, a statue, a picture.

But his operations taken together are so insignificant, a little chipping, baking, patching, and washing, that in an impression so grand as that of the world on the human mind, they do not vary the result.

The sun setting through a dense forest.
Wind turbines standing on a grassy plain, against a blue sky.
The sun shining over a ridge leading down into the shore. In the distance, a car drives down a road.

Undoubtedly we have no questions to ask which are unanswerable. We must trust the perfection of the creation so far, as to believe that whatever curiosity the order of things has awakened in our minds, the order of things can satisfy. Every man’s condition is a solution in hieroglyphic to those inquiries he would put.

ATTENTION: All pictures refer to an Amiga 500 Rev.6A. If you own a different board revision or a different Amiga, then the positions on the photos will differ! In case of doubt or basic questions, please send a short email to info@retrobuddys.com with the exact model / revision BEFORE installation. Please always carry out installations/removals on an ESD mat with potential equalization. Never stand on a (polyester) carpet during installation. If no professional chip puller tool is available (see photo) Please lever out the chips *carefully* with a small electric screwdriver from both sides at the same time. Never lever out one side first and then the other! This can (will…) damage the chips of your Amiga. In case of crooked legs, straighten the chip *carefully* on an ESD mat with little pressure. If a leg is crooked/clenched *very carefully* press the leg straight with very small pliers/tweezers. If you have no installation/conversion experience at all, we will be happy to install the parts you have purchased from us at a flat rate of €30 plus 2*postage and provide a functional warranty. We assume that you know how to open your Amiga! If you have any difficulties with this, please send an e-mail to info@retrobuddys.com As soon as you have opened your Amiga, please remove the existing Kickstart Rom from the socket and align it (small notch, round dot, semicircle on the chip side). Normally the notch on an Amiga 500 Rev 6a points to the rear of the connection ports. Now you can insert the 4-way Kickstart Switcher into the socket. The alignment of the notch should correspond to the alignment on the mainboard. The cables are usually aligned towards the rear of the connection ports. You can now either route the two switches through the flaps of the side expansion port or carefully drill 2 holes in the housing of your Amiga. Please note that there are different versions of the switcher for the different Amiga 500 motherboard revisions (Rev.5, Rev.6a). For earlier versions than 5a there is *no* working switcher and with the Rev 8/Amiga 500+ you have to solder on the mainboard, as important resistors were not fitted from the factory. If you need further hardware mods, a Gotek drive, a complete Amiga, a PiStorm or just cables, please contact us. With your next order in our webshop www.retrobuddys.com you will receive free delivery with your personal voucher code 8ybykhw9. If you are missing something in the webshop, please ask by e-mail (info@retrobuddys.com). We have *almost* everything for your Amiga 500, 600, 1000, 1200 and 2000.

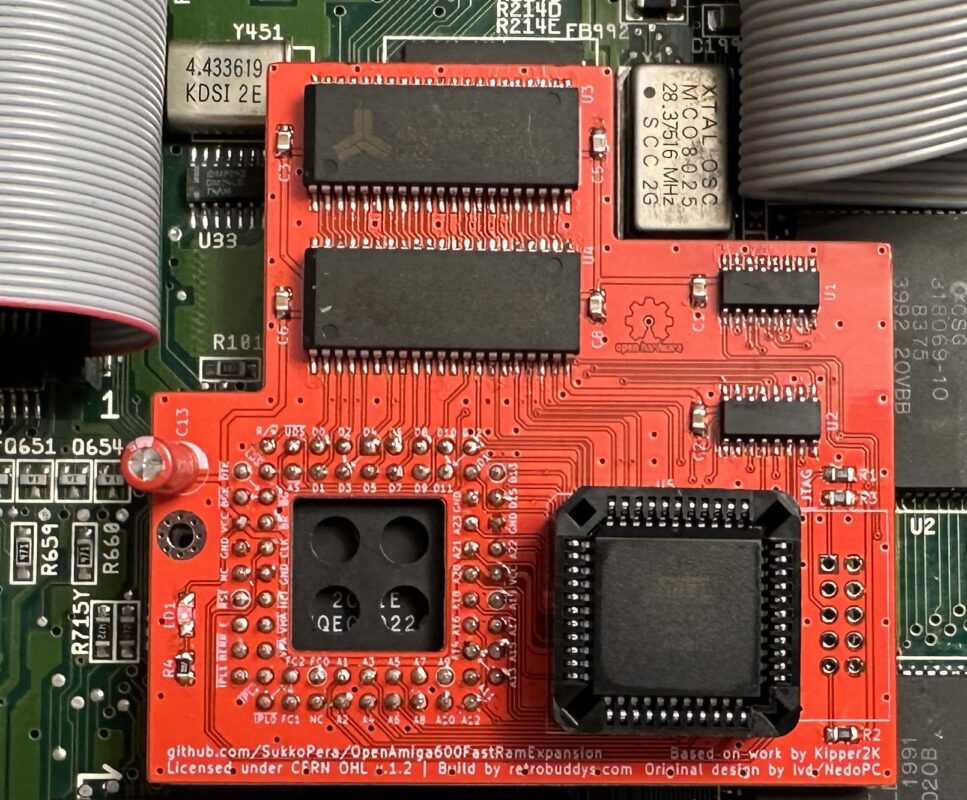
4MB Amiga 600 FastRam extension

4MB Amiga 600 FastRam extension

In case of doubt or basic questions, please send a short e-mail to info@retrobuddys.com BEFORE installation.

Download Amiga TestKit by Keir Fraser => https://github.com/keirf/amiga-stuff/releases/download/testkit-v1.20/AmigaTestKit-1.20.zip

Please always carry out installations/removals on an ESD mat with potential equalization. Never stand on a (polyester) carpet during installation.

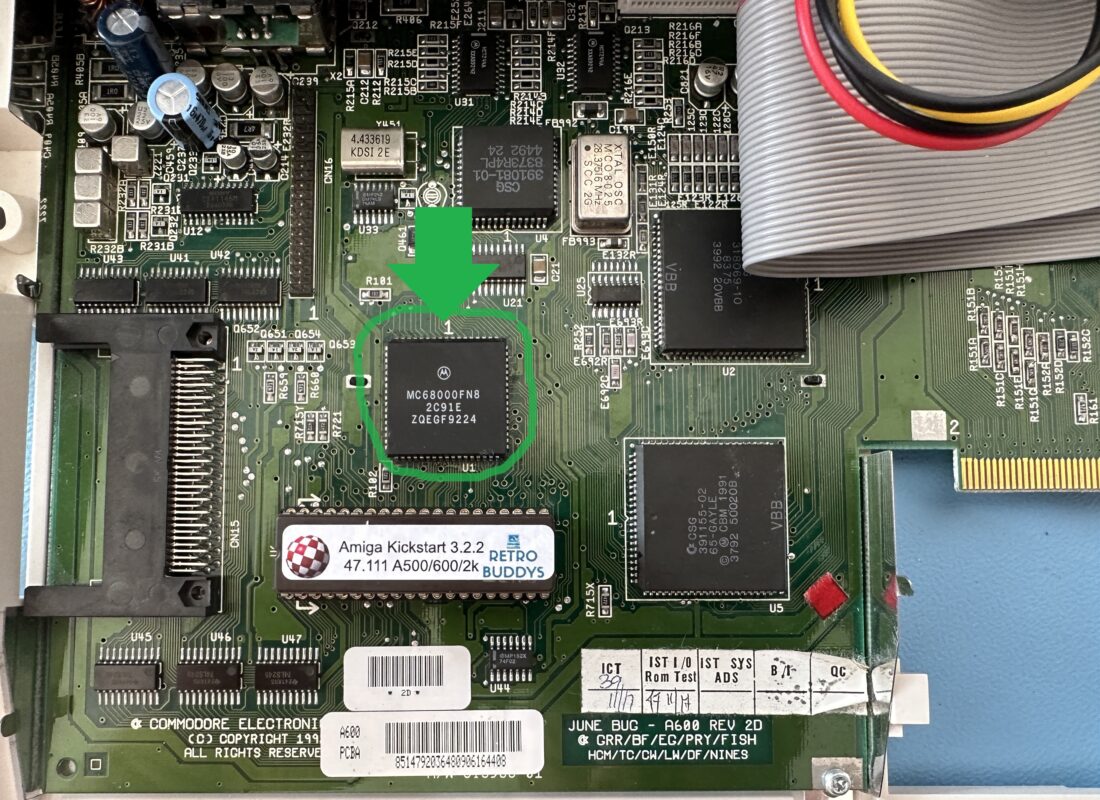
You are now ready to install the expansion into your A600, but before you do, we recommend cleaning the CPU pins with contact cleaner or isopropyl alcohol and a toothbrush or cotton swab, as they have probably accumulated all sorts of gunk/lint/etc. over the years.

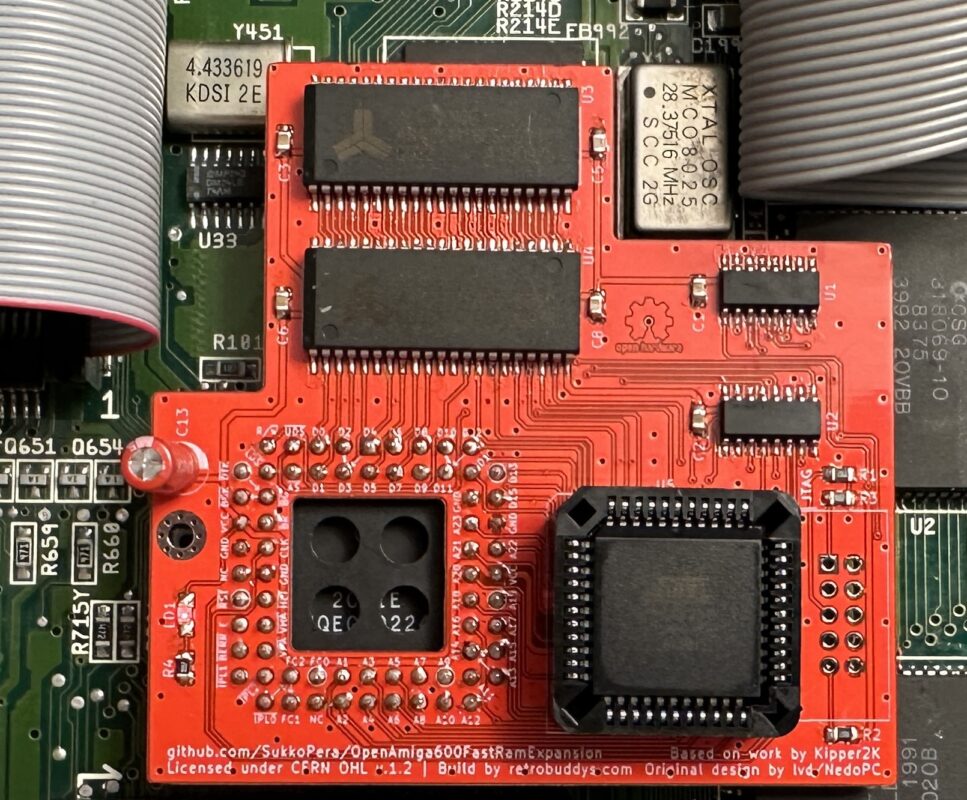
Allow the CPU to dry well and then place the extension on the CPU in the correct orientation and press it down firmly until it feels firm. No effort should be required.

The socket on the memory expansion is modified and the chip is actually inserted there and not plugged in from above. Therefore, please do not constantly insert and remove it, otherwise the socket will wear out very quickly. If possible, do not shake, turn or place the computer horizontally after installation.

Before you reassemble the case, we recommend running Amiga TestKit. Use the memory option (F1), 4 MB Fast RAM must be displayed. Then start the memory test (F1 again) and let it run for 20-50 cycles: If the TestKit does not find any errors, the memory expansion is seated correctly. If errors occur, switch off the computer and try to fit the extension better by pushing it further down or turning it slightly back and forth.

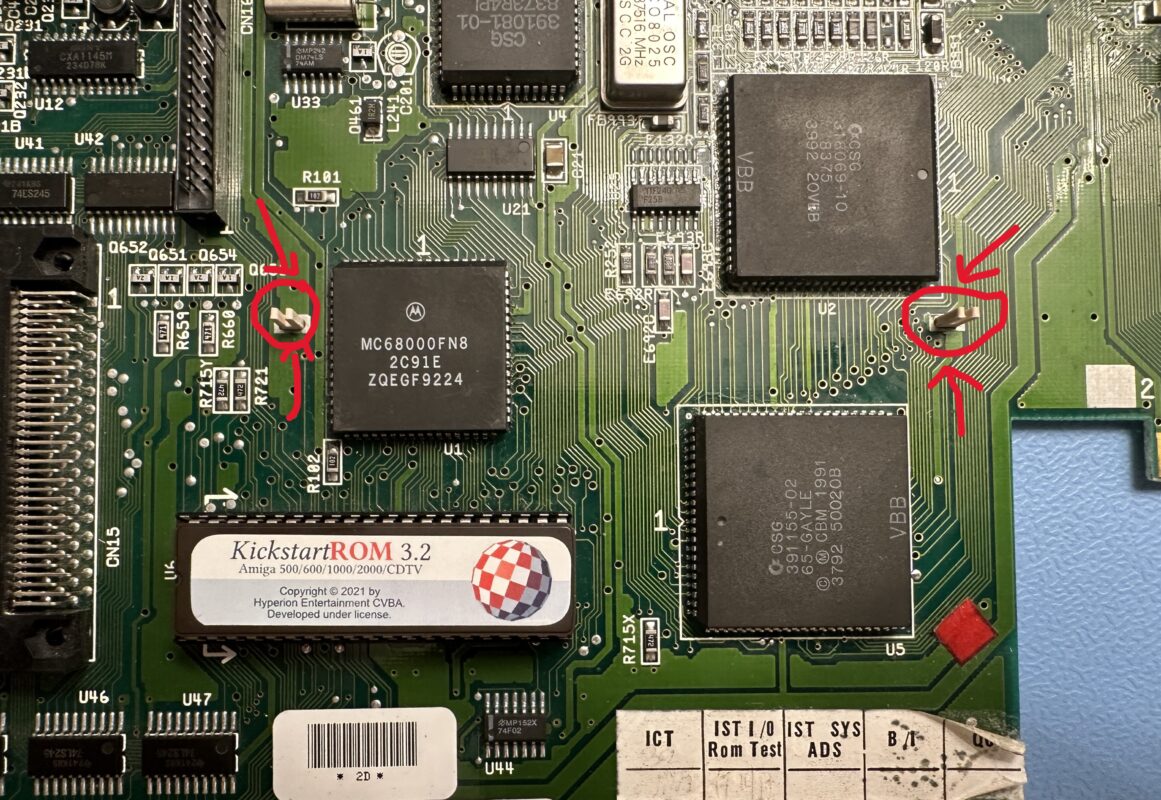
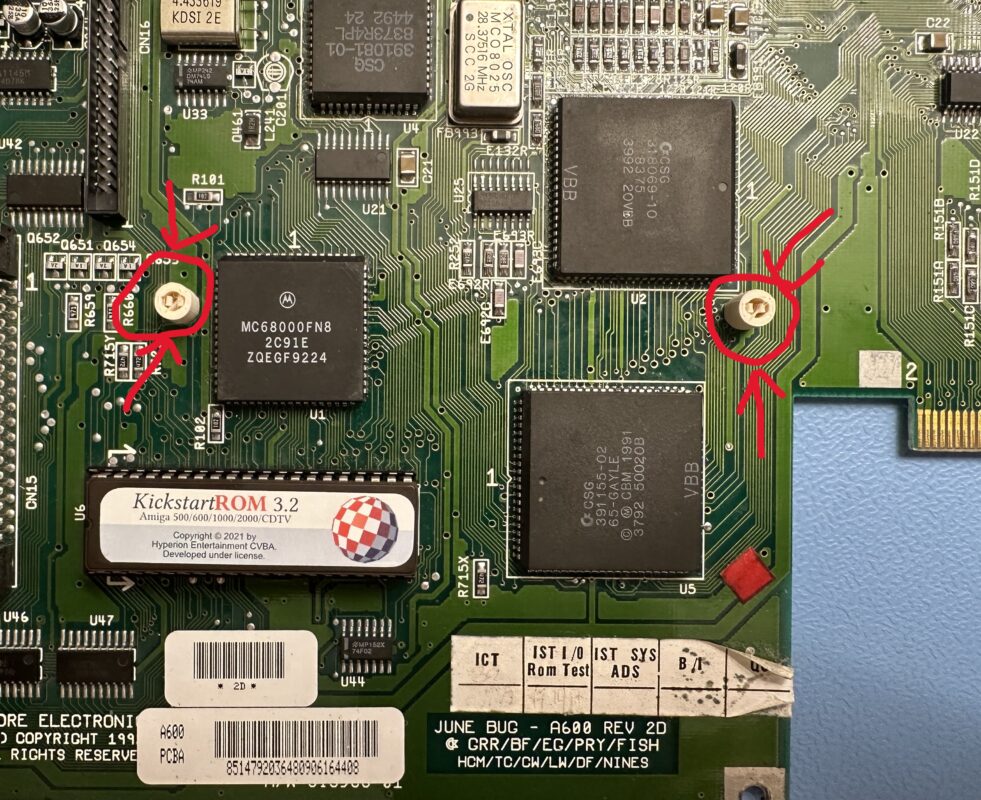
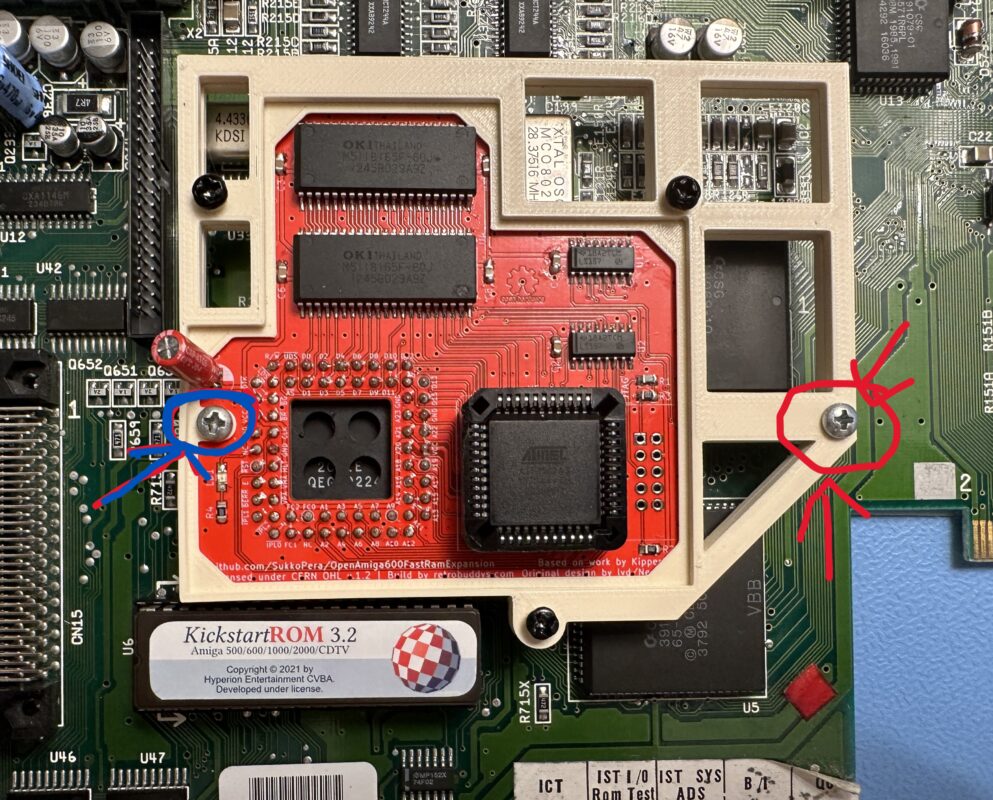
It can happen that the card slowly moves out of the base over time. To avoid this, you can anchor it to the motherboard using the hole to the left of the CPU, which should match one of the holes for the feet of the hard disk bracket.

Note that, as already mentioned, the PLCC socket is not intended for this type of use, which means that the contact quality deteriorates a little each time the board is inserted or removed. So try not to remove them unnecessarily. If you notice that the contact has deteriorated so much that the machine is no longer stable, the base must be replaced.

Each memory expansion has been extensively tested by us and has been written, read and verified for at least 50 cycles with the “Amiga Testkit” without errors.

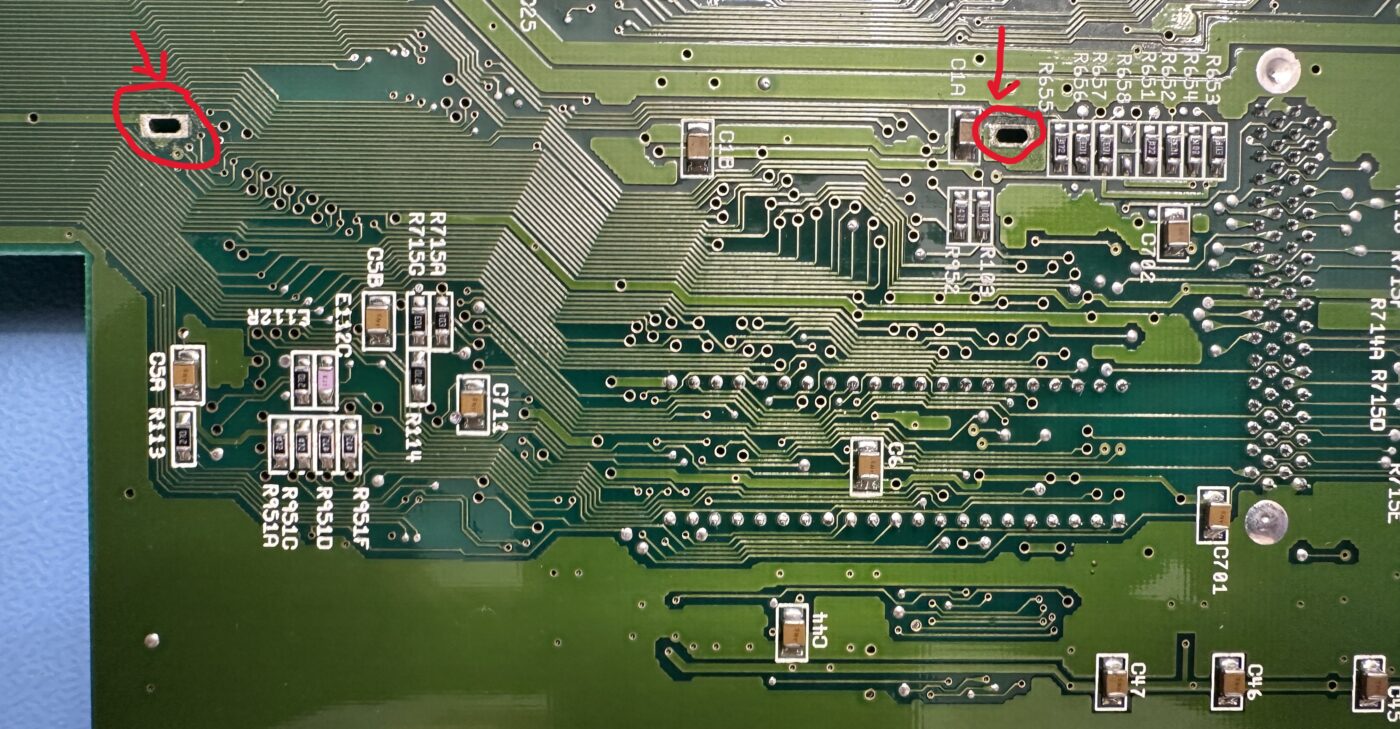
If you have received the 3D frame from us for mounting the memory expansion, you must first remove the mainboard from the housing. Then turn to the back and look for the 2 rectangular holes.

Please insert T-shaped pins into these holes. If they are too wide, please sand them down carefully with some sandpaper. For safety, we have included 2 sets consisting of pins and spacers.

If you have not received a mounting frame, then you have a memory expansion with a very strong socket from AMP which does not detach from the CPU even when you lift your Amiga by the memory expansion and you therefore do not need a frame.

Please turn the mainboard over.

Now you have to attach the round spacers with the rectangular side.

Finally, please attach and press on the memory extension and tighten it carefully with the screws supplied. Please remember that the frame is made of PLA plastic and breaks off easily.

After solid always comes from 😊

Before you reassemble your Amiga 600, please test it once with the Amiga test kit.

New Amiga products

In the next few weeks you will find a few new products in our store. On the one hand, these are additions from the existing portfolio, on the other hand, they are completely new projects.

You can look forward to the following products:

  • 4/8 MB FastRam for Amiga 500 (aka GottaGoFast)
  • Simple IDE for Amiga 500
  • PiStorm for Amiga 500/2000
  • Awesome 68k CPU Re-Locator
  • Amiga 500 Rev.3+5 Kickstart EEProm Adapter

In addition, we will offer all projects as “PCB Only” and “Kit”. We’ve had a few requests from the community for complete craft kits, especially in the last few weeks.

Workbench 3.2.2 Clean Install

A few days ago Hyperion released the now 2nd update of Amiga OS 3.2 (here). Time to describe once how to make a fresh installation on a CF card with WinUAE.

I won’t go into the hardware because there’s really nothing to do. However, you need a Compact Flash card with a capacity of 4 GB, a CF-IDE adapter (see store) and of course a Compact Flash reader for your computer. This guide also assumes that you are using Windows, although it should be possible to perform pretty much the same procedure with FS-UAE on Linux or Mac.

Step 1 – Download tools
First of all, you need to download a set of software.

WinUAE – Amiga emulator
This tutorial uses the WinUAE Amiga emulator which can be found at https://www.winuae.net. We have used the version 4.10.1.

Kickstart/Workbench
You need a copy of the Kickstart ROM and the Amiga OS 3.2 CD (available here in the Store). To do so, please download Update 1 (Amiga OS 3.2.1) and Update 2 (Amiga OS 3.2.2) from Hyperion. As a Retrobuddy customer you have received a direct link from us. Please unzip the update 2 to use the latest Kickstart ROM Kickstart 3.2.2 47.111.

PFS3 file system support
We recommend using the PFS3 file system and you need to download the handler for it from http://aminet.net/package/disk/misc/pfs3aio. This is not strictly necessary, but it is faster than the standard AFFS and supports larger partitions.

Win32 Disk Imager
You should use Win32DiskImager to make regular copies of CF card images or download different ones from our website as a Retrobuddys.com customer. You can find the disk imager here: https://win32diskimager.org/ 

Step 2 – Prepare CF card
To use the Compact Flash card in an Amiga, you must remove all previous file system information from it. To do this, start diskpart as admin in the command prompt.

First list your hard disks by typing “list disk”. This should give you a result something like this:

Next select your compact flash card, in my case it is disk 2: “select disk 2”.

Be very, very sure that you choose the right plate. You will destroy everything on it otherwise.

If you want to be absolutely sure that you have selected the correct disk, you can run the Detail Disk function to check. When you are 100% sure, run “Clean”. This deletes the file system information from the disk and makes it ready for use in the Amiga. Exit diskpart.


Upload Image...

Adding the Compact Flash card
The next step is to add the compact flash card. For this reason, you must run WinUAE as administrator, otherwise it will not work.

Click on the “Add Hard Drive” button.
Select the Compact Flash card as the hard disk (it may be called something completely different on your computer)
Switch from UEA to IDE (Auto)
Make sure that Read/Write is enabled.
Click on the “Add hard drive” button.

Step 3 – Configure the virtual Amiga in WinUAE
Start WinUAE as administrator. This is very important (right click on the icon “Run as administrator”) => Now we need to configure the system. Please try to rebuild your “real” Amiga 1:1.

Start the virtual machine!

Step 4 – Partitioning the Compact Flash card
Now we need to partition and format the Compact Flash card for use in an Amiga.

This is how it should look when you start your virtual Amiga
Open the installation disk and the HDTools drawer.
Start HDToolbox, you should see Interface SCSI, Address 0, LUN 0, Status Unknown
This is how HDToolbox should look like when you start it with CF card installed
Click on “Change drive type” -> “Define new” -> “Read configuration” -> “Continue” to configure the CF drive (ignore the read values, the Amiga does not really understand 4 GB drive)
Click OK and go back to the list of disks in the system.
Click on “Partition Drive”.
Set up a small(er) system partition, about 250 MB. Change the name to DH0.
Set up the rest of the CF card as a partition and name it DH1.
Example of CF card partitioning
Optional: Use the file system pfs3
Activate the advanced options and then click “Add/Update”.
Click Add New File System
Enter the filename f:pfs3aio (NOT pfs3_aio-handler as claimed in the video, this is no longer correct) and click OK
Change DosType to 0x50465303 and do not forget to press Enter in the field
Click OK and OK to return to your partitions
Select DH0 and click “Change” to switch to the new file system
Select “Custom File System” or “PFS/03” (depending on your Workbench version, I think)
Make sure that identifier is 0x50465303 (otherwise change it)
Change MaxTransfer to 0x1fe00 (and press Enter)

Welcome Retro Buddys!

Welcome to Retro Buddys!

After some development time we finally went live today. The team behind the buddies has already considered the last year whether and to what extent it would be useful. can turn an “old” hobby into a business. Our aim is to be a contact point for the retro computing community around the “old” Commodore computers and to support the HW Mod community with words and deeds.

Many people are like me, they made their first steps 30+ years ago with the first Commodore computers – no matter if VIC-20, C64 or Amiga. I myself can still. remember very well how I worked with. my soldering iron have destroyed one or the other computer. However, I also learned an enormous amount while “scrapping”. Parallel to the HW mods I also learned to program the computers – especially C64 and Amiga 500. The 64 of course only in assembler and the Amiga to. Start with C and later 100% assembler.

Also, I am self taught to the demo and cracking scene and I still find it amazing today how many of “my” demo’s and hack’s still exist.

If you have any questions, need help or support, just ping us at info at Retrobuddys dot com. We are happy to help!