Nature, in the common sense, refers to essences unchanged by man; space, the air, the river, the leaf. Art is applied to the mixture of his will with the same things, as in a house, a canal, a statue, a picture.
But his operations taken together are so insignificant, a little chipping, baking, patching, and washing, that in an impression so grand as that of the world on the human mind, they do not vary the result.
Undoubtedly we have no questions to ask which are unanswerable. We must trust the perfection of the creation so far, as to believe that whatever curiosity the order of things has awakened in our minds, the order of things can satisfy. Every man’s condition is a solution in hieroglyphic to those inquiries he would put.
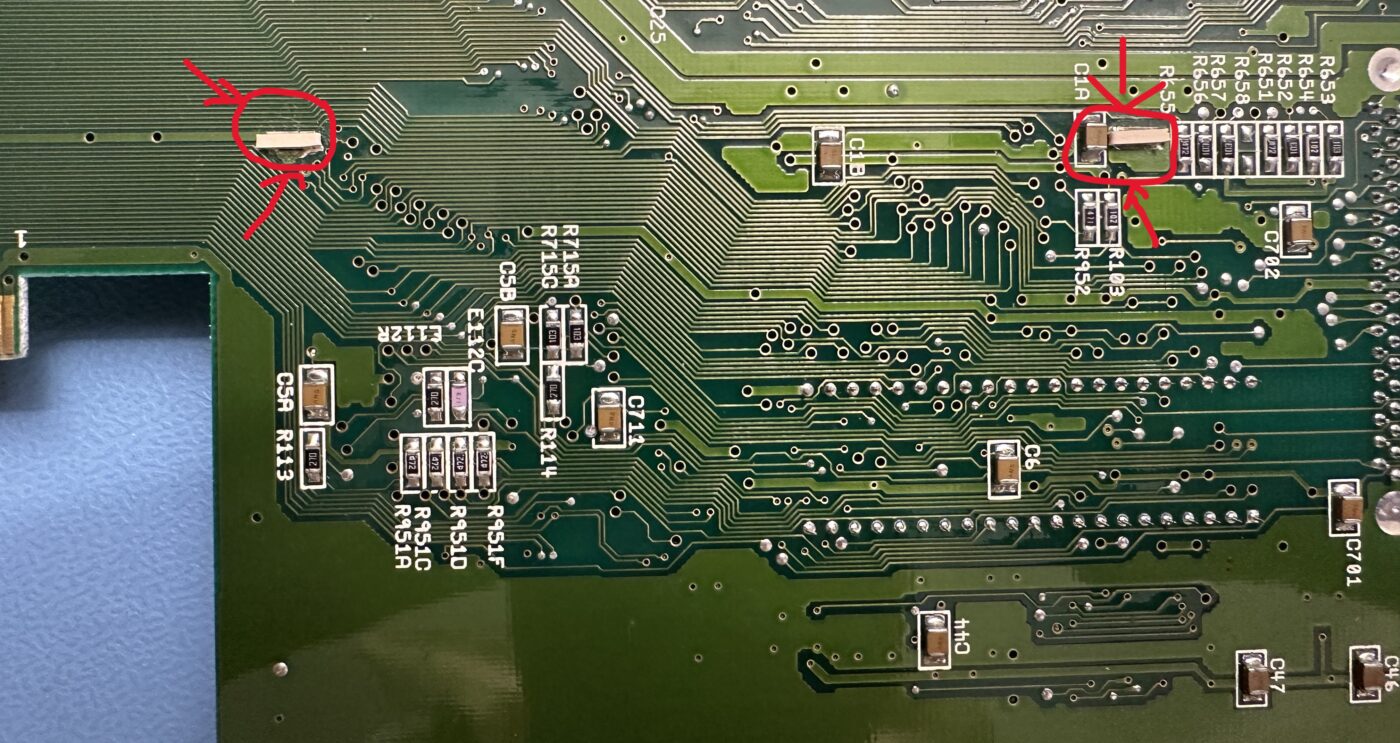
ATTENTION: All pictures refer to an Amiga 500 Rev.6A. If you own a different board revision or a different Amiga, then the positions on the photos will differ!
In case of doubt or basic questions, please send a short email to info@retrobuddys.com with the exact model / revision BEFORE installation.
Please always carry out installations/removals on an ESD mat with potential equalization. Never stand on a (polyester) carpet during installation.
If no professional chip puller tool is available (see photo)
Please lever out the chips *carefully* with a small electric screwdriver from both sides at the same time. Never lever out one side first and then the other! This can (will…) damage the chips of your Amiga. In case of crooked legs, straighten the chip *carefully* on an ESD mat with little pressure. If a leg is crooked/clenched *very carefully* press the leg straight with very small pliers/tweezers. If you have no installation/conversion experience at all, we will be happy to install the parts you have purchased from us at a flat rate of €30 plus 2*postage and provide a functional warranty.
We assume that you know how to open your Amiga! If you have any difficulties with this, please send an e-mail to info@retrobuddys.com
As soon as you have opened your Amiga, please remove the existing Kickstart Rom from the socket and align it (small notch, round dot, semicircle on the chip side). Normally the notch on an Amiga 500 Rev 6a points to the rear of the connection ports.
Now you can insert the 4-way Kickstart Switcher into the socket. The alignment of the notch should correspond to the alignment on the mainboard. The cables are usually aligned towards the rear of the connection ports. You can now either route the two switches through the flaps of the side expansion port or carefully drill 2 holes in the housing of your Amiga.
Please note that there are different versions of the switcher for the different Amiga 500 motherboard revisions (Rev.5, Rev.6a). For earlier versions than 5a there is *no* working switcher and with the Rev 8/Amiga 500+ you have to solder on the mainboard, as important resistors were not fitted from the factory.
If you need further hardware mods, a Gotek drive, a complete Amiga, a PiStorm or just cables, please contact us. With your next order in our webshop www.retrobuddys.com you will receive free delivery with your personal voucher code 8ybykhw9. If you are missing something in the webshop, please ask by e-mail (info@retrobuddys.com). We have *almost* everything for your Amiga 500, 600, 1000, 1200 and 2000.


 Français
 Español
 Italiano